


|
|
|
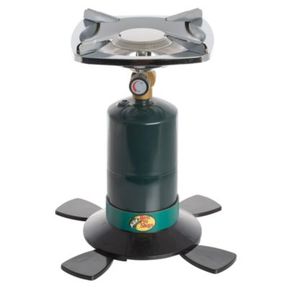
Do you get hungry while ice fishing? Do you have a Mr. Heater Big Buddy Heater and 3 dollars for a paint bucket grate? If you answered yes, you can now have a Red Neck ice fishing grille

|
|
|
|

|
|
Notch a paddle to easily grab your decoys.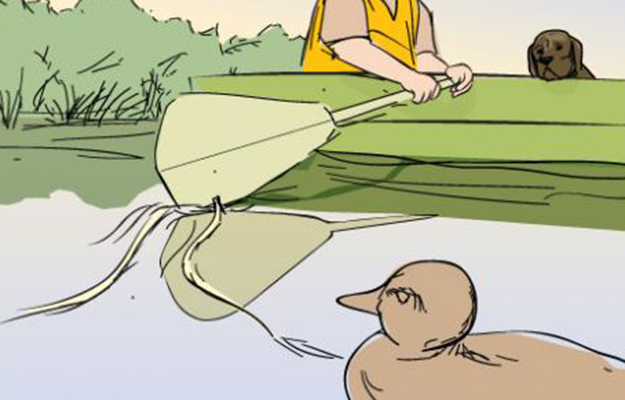
|
Keep a dental pick handle to deal with backlash.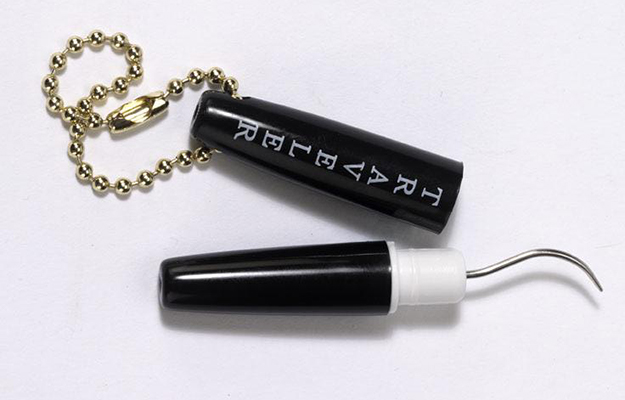
|
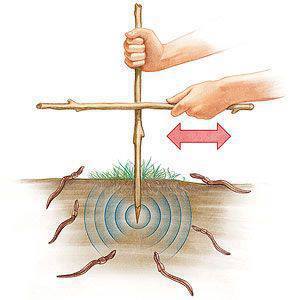
Calling All Worms! This surprisingly simple technique will unearth some surprising results! Find an area of loose, slightly moist soil (the dirt under a log or landscape timber works well) and push a 12- to 18-inch-long stick two to three inches into the ground. Vigorously rub another stick from side to side against it for about 2 minutes and watch as any worms in the vicinity wriggle to the surface. Try several areas in the yard to see which ones are the hottest worm hangouts
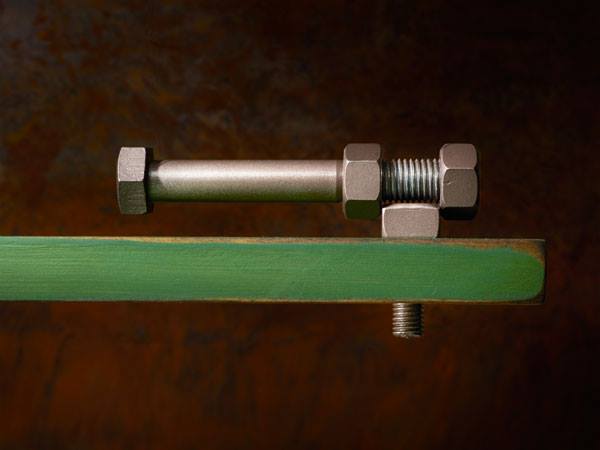
No wrench? No problem!
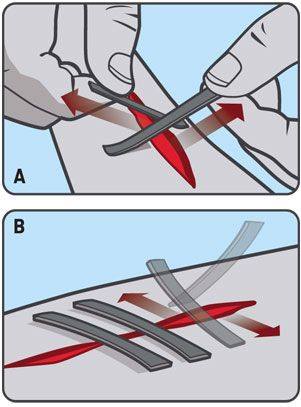
How to close a wound with duct tape:

|
|
Lose the moiture and mold!

Outside the home, cat litter can also benefit in moisture control. This includes inside boats, where moisture can be a serious issue, or in campers
and RVs. Simply place a few open containers around the boat, RV or camper. The cat litter will absorb not only the moisture, but also the mildew and odors, according to Boat Safe, an online boating resource. Be sure to replace the cat litter regularly, as it will lose its effectiveness once it has absorbed all the moisture it can hold.
and RVs. Simply place a few open containers around the boat, RV or camper. The cat litter will absorb not only the moisture, but also the mildew and odors, according to Boat Safe, an online boating resource. Be sure to replace the cat litter regularly, as it will lose its effectiveness once it has absorbed all the moisture it can hold.

The Rusty Gull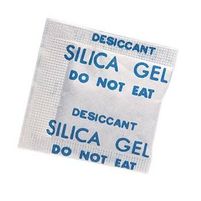
To keep your tackle box/gun case rust free, throw a few silica gel pouches in the bottom of the box/case . You dont even need to buy them they are commonly found when you purchase electronics and even new shoes.
|
The Lounge Lizard
A folding chaise lounge makes an excellent goose hunting seat. Adjust it into its flat position, put it in the middle of your spread, and cluster decoys around to break up its outline. Drape it with camo cloth and lie down, then cover yourself, keeping your gun and arms free so that you can easily sit up to shoot. Hold a decoy between your legs to simulate a goose on a vantage point.
|
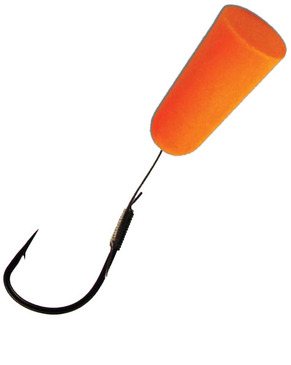
Earplug indicator
|


|

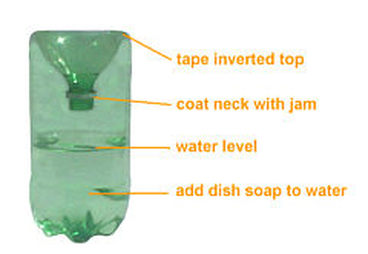
Make a simple Wasp Water Trap
|
Use a razor knife to cut the top from a 2-liter plastic pop bottle. Cut just above the shoulder of the bottle. Discard the screw top. Fill with water about halfway. Coat the neck with jam, invert it and set back on the bottle. Use two
small pieces of tape to hold it in place. Wasps will go down the funnel to get the jam, but will find it difficult to get out. Most will drop into the water and drown. A few drops of dish soap in the water will make it hard for the wasps to tread water, and will hasten their demise. (You can also add a 1/4 cup of vinegar to the water to discourage honeybees from entering the trap in search of water.) Note: In the spring and early summer, wasps are attracted to protein-based baits; use jam or other sweet baits in later summer and into fall. Empty the trap daily! As more wasps are caught, they create a raft on which other wasps can survive for a considerable time. Some of these wasps then find purchase on the plastic of the bottle and eventually crawl out. The longer the trap is untended, the more wasps will manage to escape, which may result in swarming.The trap will be most effective if set about 4' above ground. http://eartheasy.com/live_natwasp_control.htm |
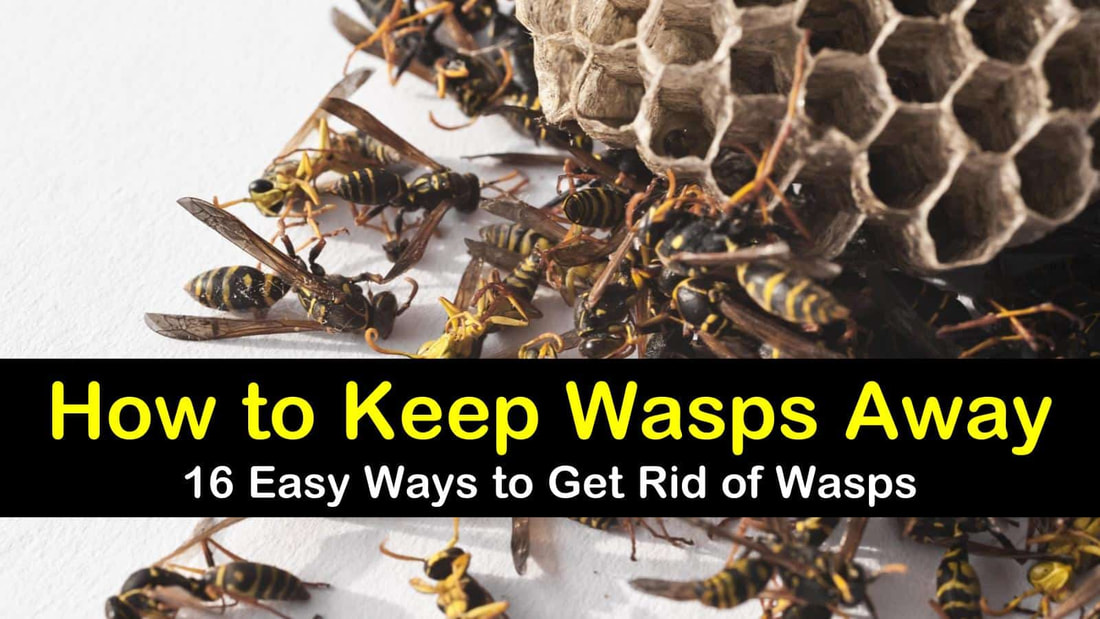
Looking for more tips on dealing with wasps? Take a look at these 16 great ideas.


|
Stop Rust With Rice!For ammo storage in a bug free environment, use uncooked rice to prevent moisture buildup. Wrap it in a single layer of tissue paper and store it in your ammo boxes. It works just as well as desiccants like silica gel but is much easier on the wallet and the environment.
by Levi Garrett |

Make A Camp Stove!
|
|

Rusty Barrel? by Ben Boolit Master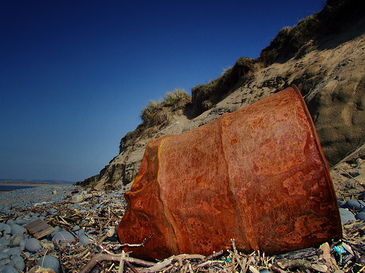
|
To remove the rust, take 0000 steel wool and wet the barrel ( and any other rusted metal parts ) with WD-40. Allow it to soak for a few minutes, take the 0000 steel wool and begin to rub. You may find it necessary to spray more WD-40
onto your 0000 steel wool to keep it wet. The rust will begin to leave the barrel and go into a liquid with the WD-40. You'll end up with a red / brown liquid all over the barrel. You can now take an old white cotton T shirt and begin wiping away the rust. This may require several applications of this technique to remove all the rust. Once the rust is removed, put a light coat of this material ( in the link below ) on your metal ( and inside your bore ) once ever 2 months. Your rusting will be OVER. Never store a pistol, rifle, or shotgun in ANY type of case. Keep them in a constant temp ( and preferably a low humidity area ) in the open or in a gun safe with a Golden Rod. Here is the material you'll need to prevent any additional rust ( You MUST apply this material after you've done the above technique or the rust will reappear and I mean quickly ! WD-40 is a very poor, long term, choice for a rust preventative on your firearms ) , once your metal is cleaned and is rust free, use this product : http://www.fluid-film.com/ It is one of the best rust preventatives that I know of. It will not harm fine bluing . A lot of farm supply stores carry the product. It is some amazing stuff when it comes to preventing rust. |


|
zip a dee doo dah By: COMeatHunterZip ties are a great invention and almost as indispensable as duct tape for
repairing, fixing, or strengthening a whole variety of items. I like to carry several different sizes from 4” to 16” in my hunting pack. Specifically, I like to use them for deer and antelope to help keep the carcass closed while dragging them from the field back to the truck. After you’ve field dressed your animal, you either need to drag it back to the vehicle or you’ll have to quarter it so that you can pack it out. With smaller game, I usually go with dragging when possible. It seems easier although I’m not sure that it is. The big downside to dragging though is getting all of the sage, grass, brush and dirt inside the animal during the process. Zip ties work great for “sewing” up you carcass fast and easy. We usually put a single zip tie around the back legs right at the hock and the same for the front legs. Then use a couple more on the ribs to keep the carcass mostly closed. If you also like to open the brisket when field dressing your critter, you can easily close this with zip ties too. If your zip ties are too small, again it’s easy to fasten several together to make a longer zip tie or you can simply make loops from the ties and link them together like a chain, tightening the loops to after you’ve got them fastened through the ribs, etc. Zip ties are just handy to have around anyway, but they are lightweight enough to put several in your hunting pack and not even notice. And when it comes time to drag that deer back to the truck, they sure help in keeping the carcass clean. |

Three Ways to Weatherproof Your Rifle by Tyler Freel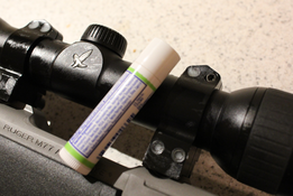
If you’ve ever hunted in the rain, or even just cold temperatures, you know the toll adverse weather can take on your rifle. In a few weeks I’m headed down to Afognak Island to hunt deer, and although it’s a hunter’s paradise, the conditions can’t get much worse for a rifle. Between the constant humidity, rain and salt water, even an “all weather” rifle will rust in no time at all. Here’s how to fight back…
|
Oil: The best way to prevent rust is to use an oil wipe, or a product like Gunslick’s rust preventative. You want to oil all surfaces
of the barrel and action (with the exception of the bore). This is pretty straightforward and if done on a daily basis, it’s a great way to stop corrosion. Muzzle Tape: I always, always, always keep a strip of electrical tape wrapped around my barrel so I can keep the bore covered. You can shoot right through this (the air forced down the barrel blows out the tape before the bullet gets there). I’ve taken a lot of animals this way, and it in no way affects the accuracy of the bullet. It is important not to oil the bore, however, as this will often change the trajectory of your first shot. Scope Mount Screws: A trick I learned from my sheep hunting partner Steve is to use chap stick to fill the scope mount screw heads. Even while using oil, the screw heads always seem to get rust in them, and if you fill them with chap stick, it keeps water out, and dissolves easily with a cleaning solvent after you come back out of the field. |
Stretch Your Bumper Budget by Chad Love
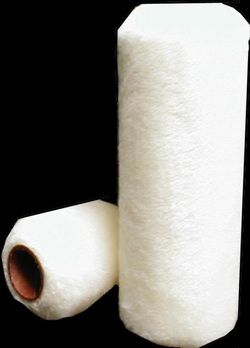
So here's a little tip to stretch your bumper dollars. Save the real bumpers
for throwing marks and water work and use white paint rollers for your pile work
and drills. They're cheap, about the same size as a standard bumper and you can paint them (with non-toxic paint) or cover them with orange tape if you want
orange bumpers for blind work.
Obviously you can't throw marks with them or use them for water drills, but
that's what your precious and expensive real bumpers are for. And if you lose
the the paint rollers (and remember, you will) replacements are three bucks for
a four-pack down at your local hardware store.
Puppy Modifier
Got a hunting-dog pup chewing up everything in camp? You can stop this behavior in a pinch by spraying boots, leashes and other chewables with diluted lemon juice.
|
Creamers?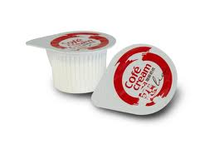
Using frozen bait that doesn't sparkle? Try using one or two creamers in the
brine. That will bring out the shine and lustre of the scales. |
Homemade Bean-Bag Rest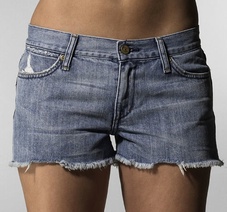
You can make your own shooter's rest by cutting a 12-inch section from the leg of a worn-out pair of pants. Sew one end closed and fill with dried beans. Then sew the other end shut. Your homemade bean-bag rest will steady your gun while
you sight it in. |

|
Nature's Thermometer
Wondering what the temperature is but don’t have a thermometer? Count the number of chirps a cricket makes in one minute, then add 40. The sum will be very close to the outside temperature.
|
Rubber Worms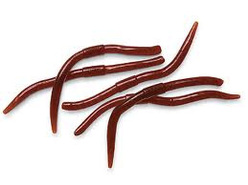
Always keep a couple rubber fishing worms with you when camping.. Not only for use as artificial bait for fishing but they can be used for an emergeny fix... If you notice a small tear or hole in your tent, just melt the rubber worm and apply to the hole...
|
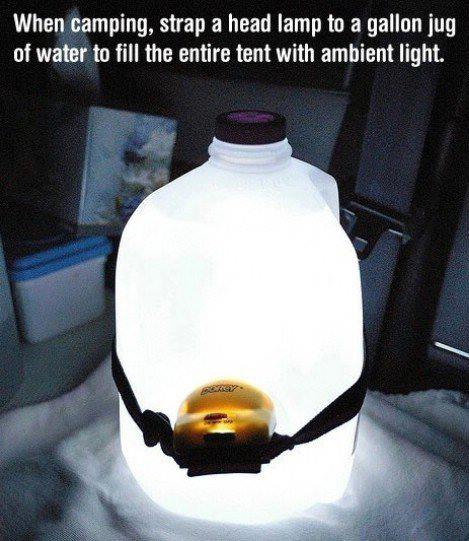
A "Must Have" in any Survival Kit!
Remember the days of always having your own little survival kit stored in your wallet? Well you might want to think about going a little retro and and adding a couple to your pack! They are light, compact and who knew they could save your life in so many other ways!
- Water container (canteen) hold up to a galon! - Fire Starter (see video) - Slingshot (see video) - Cover the barrel of a rifle in order to keep debris out - Use as a sterile dressing to cover a wound or as sterile gloves to tend a wound - Cover hands, arms and feet to retain moisture in case of severe burns. - Keep things dry - Blow it up and use as a bobber while fishing 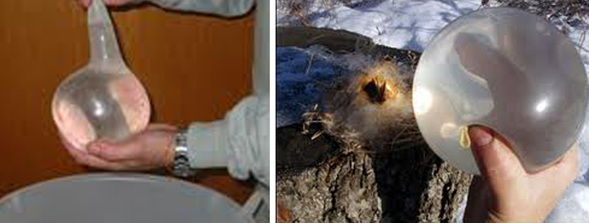
|
|
Add Colour to the Campfire!

How to Add Color to Campfires
Even though a relaxing campfire at the end of a day in the woods is the perfect end to the day, you can spice it up by adding some colorful flames to a campfire. There are various products on the market that do the same thing, but you might be able to achieve the same effect with supplies in your shed and from the nearest hardware store.
Difficulty: Easy
Instructions
Things You'll Need:
Lengths of 3/4 inch copper pipe
Matching lengths of garden hose
Step 1
Cut 3/4-inch copper pipe into 10-inch to 1-foot segments. If you're cutting it at home, use the proper equipment to cut pipe safely. If you don't have any copper pipe laying around in your garage or shed, most home improvement stores carry it in their plumbing section. Many stores will cut it into the appropriate length for you.
Step 2
Measure an old garden hose into pieces that are the same length as the copper pipe and cut. The hose doesn't have to be high-quality, and it is okay if it leaks. Its purpose is to heat the pipe.
Step 3
Stuff the hose into the pipe.
Step 4
Toss one piece of hose-stuffed pipe into a campfire and wait a couple of minutes. Before long, you should be able to see different colored flames--blue, green and purple. The colors last for quite a while, but be sure to pull them off to the side and allow the pipe to cool completely before handling it.
The Green Lantern
Soak new propane lantern mantles in vinegar for several hours. Then let your wicks dry completely before using. Your wicks will last longer and burn brighter.
|
Remove Blood Stains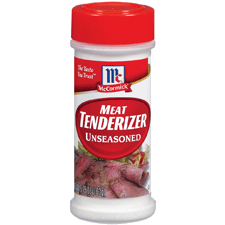
To remove blood stains from your clothing, make a thin paste solution with water and meat tenderizer. Smear it on the stained area and let set for one hour before washing. The tenderizer is an enzyme that breaks down the protein bond in the blood
|
That Really Tick's Me Off!
TWEEZER / FORCEP METHOD
By using a small pair of tweezers, grasp the tick by its jaws.Tug gently and see if it detaches. SUFFOCATION Select an oil or gel {petroleum} and apply a generous amount to the site, completely enveloping the tick. Leave it covered for about 10 minutes. If the tick is successfully smothered it will detach to simply get air. |
No More Mighty Mouse!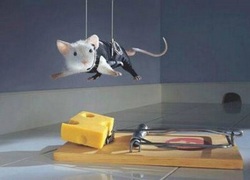
If you have trouble with mice in your camp and have run out of traps here's one trick that will get them every time.
Get a mason jar or any jar with an opening about 4 inches round. Put a piece of paper and lay it over the top of the jar then secure it with a rubber band. Cut an "X" in the paper the hang a cracker or what ever food you have lying around a couple of inches from the paper . Also put some sort of ramp by the jar so the mice can get up to it. the mouse will jump for the food and go rite through the paper every time. |
Keep those puppies warm!
Taping a hot hands pack to your spinner battery or camcorder battery will extend the life by almost 1/3 or better on those really cold days.
|
Roll down the window idiot!
Sharpen your knife on the window!
http://www.youtube.com/watch?v=vnfazpde80Y |
I'm Snagged!
The string-yank technique is a highly effective modification of the retrograde technique and is also referred to as the “stream” technique. It is commonly performed in the field and is believed to be the least traumatic because it creates no new wounds and rarely requires anesthesia.8 It may be used to remove any size fishhook but generally works best when removing fishhooks of small and medium size. This technique also works well for deeply embedded fishhooks, but cannot be performed on parts of the body that are not fixed (e.g., earlobe).
|
|
Can I see Your ID Please
Geese are easy to age. Simply look at their tail feathers. Juvenile geese have a V notch at the tip of their tail feathers. Adult geese, however, have a rounded or pointed tip on their tail feathers.
|
Button It Up
Sew a large button on the shoulder of your hunting coats to keep your gun sling from sliding off while you're setting out and picking up your decoys. It'll keep you from having to reach down to the bottom of the lake to get your gun.
|
POPCORN Anyone?
In this video we will teach you how you can make a fully functional popcorn machine out of an empty pop/soda/beer can. You can use virtually any heat source as well, your stove, a candle or even a camp fire.
|
|
Hot Potatoes!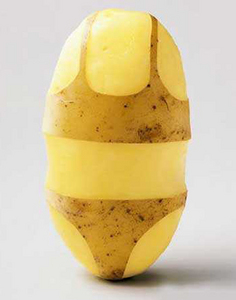
Make this boy scout staple by coating potatoes with a thick layer of mud and place potato into the hot coals as you would in foil. Lastly, the mud should be caked and hard, so you crack it open leaving you with starchy goodness!
|
Ziploc Omelet
A great way to have breakfast ready for a large at the same time. Using a dutch oven, bring a pot of water to a boil. Put 2-3 eggs in 1 quart ziploc bags, and put your names on them. Have everyone put in the baggies what they would like in their omelet. With a group of 6-8 people, we boil them for 13 minutes.
|
Only The Shawdow Knows!
Most bow hunters know how to set their stands to keep the wind in their favor. Sunlight should also be considered. Where your shadow falls in relationship to where you expect the deer to be matters. The movement of your shadow as you draw your arrow can spook the deer.
|
The Rusty Nail
PREVENT RUST ON BROADHEADS-Packing your arrows around in their quiver all season can have harmful effects on some broadheads. Rust can form on some broadhead surfaces after exposure to the elements. Coat your points with petroleum jelly. It is odorless and will keep moisture away from your cutting edges.
|
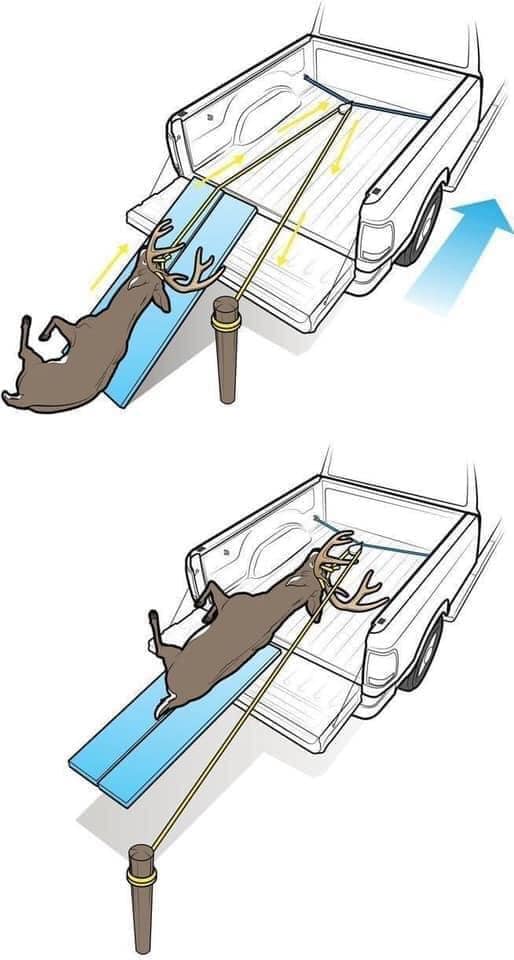
Loading a Deer Alone
If your solo deer hunt is successful, you’ll find it much easier to load your deer into your truck if you bring a sheet of 3/8 or 1/2 inch plywood cut to fit into the pickup bed. Drop the tailgate.
Slide one end of the plywood onto the ground. Roll the deer onto the wood. Now you can raise the lower end of the plywood sheet and slide it into the truck using your leg muscles instead of your back muscles. This reduces the risk of back injury and keeps your clothes cleaner, too. |
Organize Fly-Tying Thread Using Spent Cartridges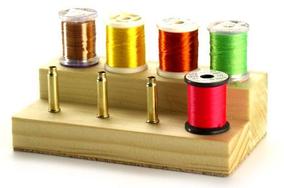
Spent rimfire cases make great spool holders for fly-tying thread and wire. I epoxied several cases onto a short strip of pine, 11⁄4 inches apart. The thread spools slip on perfectly (.22 magnum and .17 HMR work the best, but .22 LR will work, too). I also glued several spent shotgun shells onto a block of wood to hold my scissors, bobbins, and whip finisher. --Thom Romelli, Cincinnati, Ohio
|
Chill Out!
To keep your barrel from overheating at the range, bring along a cooler. First, put your bore snake inside a zip-seal bag, and then place it on ice. Between shots, insert the chilled bore snake in the barrel, where it will absorb the barrel heat. After letting it sit for a few minutes, return it to the baggie and the cooler where it will be ready for the next shot. --Jim Ryan, Muscle Shoals, Ala.
|
EZ Anchor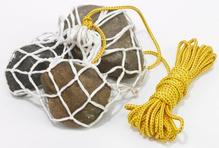
I portage my canoe a lot, so I know how much precious room a heavy folding anchor takes up in my pack. But I also don’t always want to drift-fish. Solution: a basketball net. Tie off the bottom with a short piece of rope. When you need it, fill with a few large rocks, and tie off the other end with a drop line. I use poly rope because it’s a good general-purpose rope for around camp. --Joe Doss, Columbus, Ind.
|
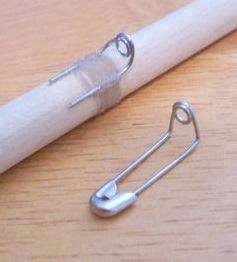
Organize and Separate Fishing Hooks With Safety Pins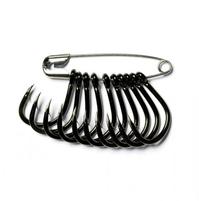
Use safety pins to keep the fishing hooks in your tackle box organized. I got tired of hooks getting mixed up, so now I use safety pins to keep them separated. Simply feed the point through the eye of the hooks. A lot of hooks fit on one pin, and it’s an easy way to keep the different kinds sorted. —Stephen Elliott, Visalia, Calif.
|
Carry Duct Tape Minus the Bulky Roll
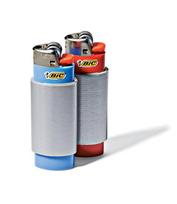
Duct tape can be a lifesaver. But carrying an entire roll takes up valuable space inside a backpack—and you probably won’t need that much tape. Instead, I wrap a couple feet around a Bic lighter, so I always have a short supply inside my pocket. If you need more, you can also wrap some around a Nalgene bottle. —Ben Wagner, Bozeman, Mont.
|
Never Dig For Nightcrawlers Again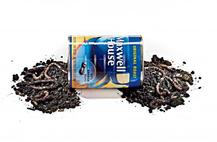
When I fish with ightcrawlers, I store them the old-fashioned way, in a coffee can filled with soil. I -remove both ends of the can, however, and cover each with a plastic lid. This way, the worms are -always accessible—I never have to go digging to the bottom. —Lowell Harner, Wabash, Ind.
|
Make Your Water Bowl Fit the Jug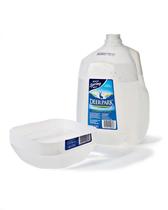
It’s important to have plenty of water for your dog in the field. To make a handy lightweight bowl, cut off the bottom third of an empty gallon jug. Take another empty gallon jug and fill it with water. The “bowl” will fit snugly over the bottom of the water jug, which makes it convenient to bring both the water and the bowl on a hunt. —Jim Rucker, Lancaster, Ky
|
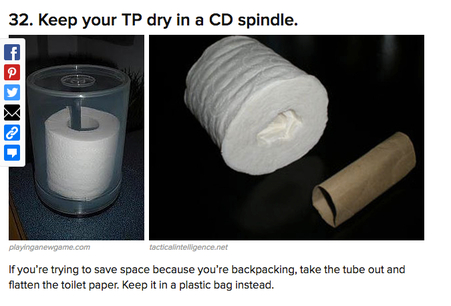
Protect your TP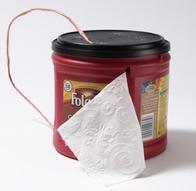
Protect Your TP at Camp Two of the most annoying problems at my hunting camp are: wet toilet paper and mice getting into toilet paper. But there’s a solution. Cut a long slit in one side of an empty plastic coffee can. Stick a roll of TP in the can and pull a bit of the paper through the slit. Make a hole in the lid and the bottom. Run string through the holes and hang the can out of reach of mice. -- Mark A. Clark, Colorado Springs, Colo.
|
Save Your Shells—and Memories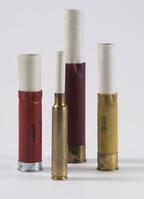
Over the years, I’ve saved the cartridges and shotgun shells from some of my hunts. Reminiscing, I realized I was starting to forget which one was which. To add a new dimension to my memories, I write down the date, weather conditions, and who I was hunting with on a small piece of parchment paper. I roll it up, place it inside, and save it as a keepsake. -- Darryl Orr, Independence, Ky.
|
Carbon Steel Blades
Carbon Steel blades CAN become stained. Best way to prevent stains, or to remove the stains without damage to your blade's finish is actually to polish it with ash from a fire.
|
Kool-Aid Dyeing
Kool-Aid Dyeing: I know that sounds funny, but it not only really works, it's inexpensive, fun and much safer to use then some of the commercial dyes.......... read more
|
Chapped Lips
Did you lose the lip balm, forget to pack it, or did you run out? No problem. Just rub your fingers on the sides of your nose. Gather up all the facial oil and rub it on your lips. Most lip balms are petroleum based, or they use oils from various plants. The oil from your face works just as well. The closer you are to your teenage years, the better this tip works.
|
Baking Soda
Baking soda packed in an old prescription bottle has a lot of uses on the trail. Mix it with water to make a paste that sooths insect bites, bee stings, or poison ivy. Sprinkle it in your sleeping bag and boots to get rid of odors. You can use it as toothpaste, deodorant, and to prevent chafing. Use it to clean your water bladder, dishes, silverware, and cookware.
|
Leave it in longer!
If you are fishing a subsurface pattern like a nymph or a streamer, let it "go Saddam," i.e. hang, at the end of the drift. I've watch countless fly fishermen work like the dickens to get the perfect drift but when they get to the end of the drift, they haul the fly out the water like a Humpback whale coming up for air. No, no, no. At the end of the drift, let the fly hang and swing in the current for a few seconds and you will get more fish.
|
Come on baby light my fire!
Build a fire without matches or a lighter so you wont freeze to death or attract predators in the wild. The finer the steel wool, the better. Most batteries will work but 9 volt batteries are the easiest.
http://www.youtube.com/watch?v=nMYWIhoJLKY&feature=player_detailpage |
Recycle that old fly line.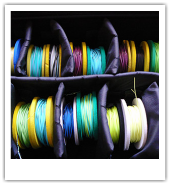
If your anchor cords on your decoys continually get frayed or rotted, try using some of your old fly fishing line. These new hi-tech plastic coated lines will last forever.
|
Recycle old mono.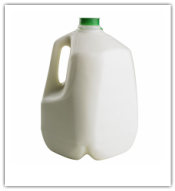
Not sure what to do with that old mono? Stuff it into a plastic milk jug and toss it into the recycling. (That way it will actually be reused and not thrown into a land fill and potentialy harming birds etc.)
|
A sharp stick in the eye!
Are the eyes looking dull on your game mounts? Simply put a few drops of Windex on a Qtip and wipe em clease. After all they are only glass you know.
|
How old are you?
For those of you interested in aging deer, or at least a guaranteed way to determine if the deer is older than 1 1/2 years of age, here is a reliable method. First locate the third pre-molar-this is the third tooth from the front to the back. If that tooth has three cusps, then you know that the deer is 1 1/2 years old or younger. If there are only two cusps, then the deer is older.
|
A little T&A
When ducks are flying toward you, it’s best not to call. Old-timers have a saying: “Call only to the T&A.” That is, do your calling when you can see one wingtip and the tail, or both wings and the tail. The ducks won’t be looking your way then, so it’s safe to blow the call.
|
The Dumpster Diver.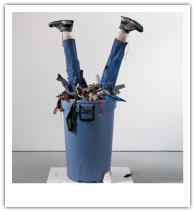
Need an easy way to move several dozen decoys from your garage to your field-hunting blind? Try using a garbage can on wheels. A commercial can will hold two to three dozen standard duck decoys.
|
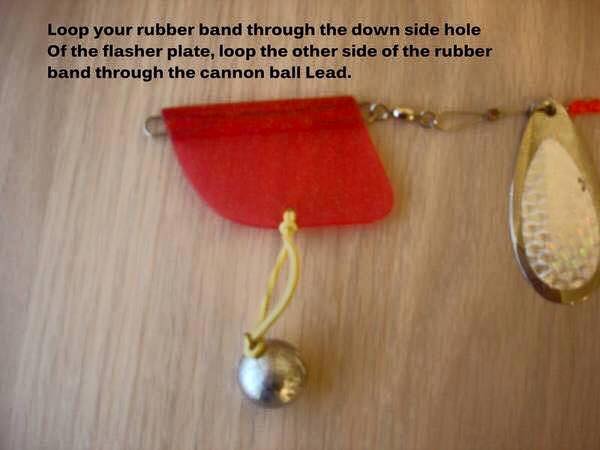
The Flasher.
Freshwater anglers can help attract stubborn fish to their offerings by borrowing a technique from their saltwater contemporaries. Tie a lightweight spoon in-line between two swivels about six feet above your bait to act as a flasher. Though fish will occasionally hit the flasher, the increased number of hooked fish will more than compensate for the difference.
|
Become Invisible?
Use baking soda to wash up and rid your clothes and body of odours so that big buck doesn’t have a clue.
|
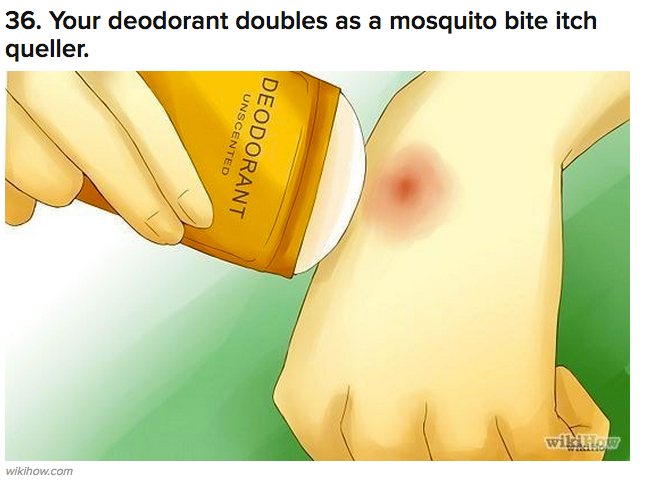
Getting Cold Feet?
Cold feet? Just grab the " Rightguard Antiperspirant" and it will stop your feet from sweating which means warmer feet. (dont use deodorant).
|
Don't get bent out of shape man!
When soft-plastic lures are stored in a tacklebox, they often get bent out of shape. Fishing them that way will reduce the number of fish you catch. Straighten them by laying them out neatly and as straight as possible in a frying pan. Add a couple of inches of water and turn up the heat until the water is at a low simmer (you want it hot, not boiling). Warm the baits for a few minutes, then remove them individually with a pair of tongs and lay them out straight in a tray of ice-cold water until cool. They should remain straight once they're removed from the water.
|
Taxi! Taxi!
Your buddies may laugh, but if you bag that special duck and want to have it mounted by the taxidermist, this tip will come in handy. Snip one leg from a pair of panty hose and keep it in your pocket. After you kill that trophy bird, rinse blood from its feathers, then place the duck head-first in the panty hose. This keeps all feathers in place so you get a nicer mount.
|
Slippery when wet.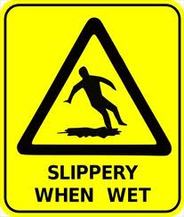
The hard rubber soles of many hip and chest waders can be very slippery when you're clambering over slimy, rocky river bottoms. An inexpensive way to increase the traction on your waders-and your confidence when wading-is to glue small patches of carpet to the soles.
|
Stay Warm
Fill your drinking water bottle with boiling hot water, wrap it in a towel, and put it in your sleeping bag a few minutes before you climb in. This makes for cozy sleeping quarters.
|
Stuff it?
Running out of room? Dont take your whole pillow just bring the case and stuff it with your jacket or clothes.
|
Birdy Yum Yum
Cleaning a Grouse.... Place the bird "back" down and spread eagle, put your feet on the wings right next to the breast (the inside of your big toe as close to the breast and on the joint as possible), grasp both legs, pull up slowly. Pitch this to the side. You will be left with a breast having the wings attatched. Cut or break off the wings and you are done. Clean, simple and cools them down quick. The warmer the bird the easier.
|
Oil?
Another tip that I have acquired over my years of hunting is to change your clothes right before you get into your sleeping bag. This is a scientific tip because it is proven that the oil from your skin on the inside of your clothes that you have been wearing all day makes you feel colder. So by changing your clothes right before you get nestled in for the night will help your body keep itself warmer as it does not have the excess oil to hinder it.
|
Red Red Wine
Use the bladder from the wine-in-a-box and clean it out. Then fill it full of drinking water and then freeze it. It works as a huge ice block that you can shape to fit your cooler while it freezes and then when it melts you have ice cold drinking water with and easy to use spout that closes completely.
|
Bring Home the Bacon
Not sure what to do with that left over bacon grease? Take it with you on the trail and smear it on a stump in your favorite honey hole. Deer cant get enough of it!
|
Frosty
Never put your bino's inside your jacket, especially when it is really cold out. Instant ice.
|
Soap on a rope?
• Rub a bar of soap along the outside of your pans when you’re cooking over an open fire. That way the black scorching from the fire will come off without too much effort.
|
Dimples
Dimples and Dents can be removed from your wood stock by placing a damp rag followed by a hot iron, process may have to be repeated several times.
|
Find the South Pole
1. How to find South. (you'll need an analog watch for this.)
o Point the hour hand at the sun. o Halfway between the hour hand and the 12 mark on the watch is South. o In daylight savings time, it's halfway between the hour hand and the 1 mark on the watch |
Wax on Wax off
Wax the bottom of your game sled before heading out hunting in the snow. If you dont you might as well have be pulling around a piece of plywood.
|
Build the Ultimate Tree Stand!
Not much more to say than
I WANT ONE! http://home.windstream.net/tomf42344/ |
Look mom no hands!
Sew a couple of loops of elastic onto the right/left side of your hunting jacket, just below your shoulder. With that take your grunt call and secure it under the loops. It keeps the call out of the way and allows you to use it " hands free" . Works well for that one grunt to stop that buck from moving so you can take that shot.
|
Pantyhose? Really?
On those cloudy days, grab a pair of your favourite pantyhose and place them over the wings of your robo duck, not sure why it works but it does! |
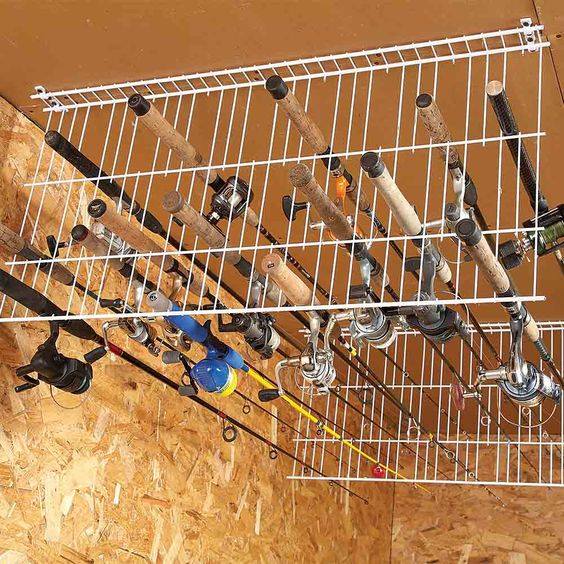
Ultimate Rod Holder
Here's a tip. Do we really need to say anything else? Just get one! they work awesome!
|
|
Kingsford?
After you long day of hunting, place a couple chunks of charcoal in your boots. This absorbs moisture and smells.
|
Put a gag on it!
When hunting where mud or snow might plug your rifle barrel simply put a layer of tape over the muzzel. It will just shoot off when you fire with no damage.
|
Mojo Baby Yeah!
If you are a robo hunter and you are hunting in deep water, try using a car intertube and cut a 1/2 piece of plywood to fit it, strap it on and and then mount your robo on top....... it also adds motion on water.
|
The Trophy Wife
Learn how to prep that trophy for mounting.
http://www.huntingtipsandtricks.com/p/Skinning_for_a_Trophy_Shoulder_Mount |
Eggs Benny Anyone?
To save space and keep eggs from getting crushed on camping trips, break them into a clean, plastic screw-top jar before you go. A dozen eggs without shells will fit into a large plastic peanut butter jar. Packed in this manner, they'll stay fresh for a week when kept in a shaded, cool spot. Pour slowly and the eggs will plop out one at a time."
|
Blinded by The Light?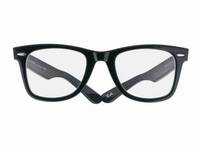
If you wear glasses, one thing you can count on is that they are going to fog up. Here’s how to stay fog-free. First, get some dishwashing liquid (such as Dawn or Joy) and a soft cotton cloth. Rinse your glasses in cold water, then apply one to two drops of detergent to the fronts and backs on your lenses. Polish both sides with the cloth until all streaks are gone. When you’re done, your glasses will be clean and won’t fog for at least five or six hours, even in humid conditions. If you wear glasses, one thing you can count on is that they are going to fog up. Here’s how to stay fog-free.
|
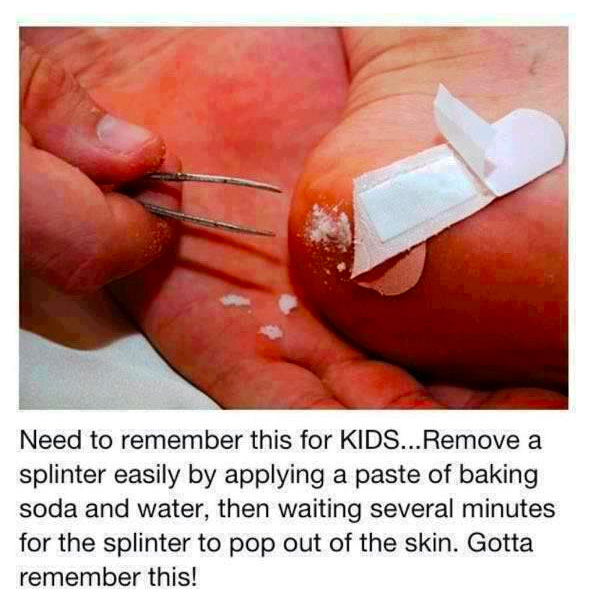
A Sticky Situation?
Super Glue belongs in the hardware drawer not the medicine cabinet right? Well, it depends. Some doctors are recommending a little of the glue for minor cuts. If you've ever gotten any on your skin you know the clear adhesive drys fast and stays put. That keeps air and dirt out of the wound and that helps small skin cracks or small cuts, like a paper cut, heal. Eventually the glue wears off. It's thought that the chemical cyanoacrylate in the glue not only stops bleeding quickly but also lead to less scarring. Although, using super glue might work in a pinch, experts say it can irritate the skin, and should never be used on deep wounds.
|
Hot Rocks
An old hunter told me this one, he would get a bunch of small rock from a creek bed, put them in a pot on the stove and leave them there all day. At night after a days hunt take the rocks and put them in your damp boots. The dry rocks will draw all the moisture out of boots plus be toasty warm in the morning.
|
I Surrender!
Tie about a foot of surveying string to the end of your barrel. You'll have a constant wind direction gauge instead of using the puffer full of cornstarch.
|
Blades of Glory
Before you sharpen your knife, run a black permanent marker down the edge -as you then move the blade over the stone, the marker wears off, allowing you to sharpen evenly.
|
Mountain Dew
Scope covers & condensation, upon returning to your vehicle: open your scope covers to ensure that any rain drops on the lenses evaporate while driving. Last thing you want is to come across a deer/moose/elk, shoulder your rifle, pop open your lense cap covers and look through a foggy scope.
. |
Diamonds in the rough?
If your decoys have begun to look dirty, try cleaning them before your next outing with tire cleaner foam (non glare). Simply hang your old decoys along your backyard fence, spray them thoroughly with tire cleaning solution, and let them dry overnight. The next morning, they look as good as new.
|
Sticky Fingers
If the reed in your call sticks, just apply some Rain X or car wax on it and its good as new!
|
Ice Ice Baby!
When hunting in below freezing weather , place your decoys in the water, don't toss them or they'll end up with a coat of ice and really shine. Of course this doesn't apply during a freezing rain. (by Blindman HuntingBC.ca)
|
Put a cork in it!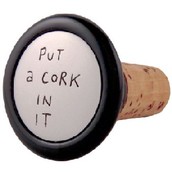
I always carry a couple of hot-glue gun sticks and a lighter in my bag. That way if I develop a leak in my waders or find a decoy with a couple of holes in it, I just use the lighter to melt the end of the glue stick and smear it over the decoy hole or wader hole. Wader repair is temporary but will last you the hunt until you can get home and affect permanent repairs to them.
|
Let it Snow , Let it Snow , Let it Snow.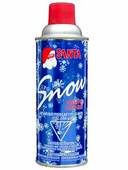
For those of you that use lay down blinds when it snows. Go to walmart and purchase that christmas tree fake snow spray. It's a buck a can. It is identical to the Avery real snow spray that sells for $7.99 a can. I keep a can in my blind bag at all times. You never know when it is going to snow.
|
Fast and easy breasts.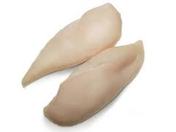
|
Skin and Barrett |